
Most people think of Telegram solely as a messaging app for group chats and channel broadcasts. But beneath its chat interface lies one of the most developer-friendly, robust, and completely free application platforms on the internet: the official Telegram Bot API.
Over the past two years, I eliminated several expensive monthly software subscriptions—including cloud file backup services, SMS alerting systems, and personal reminder applications—by building a private, custom Telegram bot. Whenever I need to send myself a temporary download link, receive automated server downtime alerts, store 1.5GB video files without eating up my Google Drive 15GB quota, or schedule calendar reminders straight from my phone while walking outside, I simply message my private bot.
Telegram provides free, unmetered access to its Bot API, allows file uploads of up to 20MB via basic HTTP and 2GB via Telegram Client MTProto, and maintains a 99.99% global uptime SLA backed by distributed edge data centers worldwide. In this exhaustive, hands-on tutorial, I will guide you through creating your own private Telegram automation assistant from scratch using Python, with zero recurring hosting costs.
Unlike custom Android or iOS apps that require building complex UI layouts, purchasing ₹8,000 Apple Developer accounts, or dealing with strict Google Play Store 12-tester review delays, a Telegram bot lives directly inside an app already installed on your smartphone. The interface is instant, lightweight, cross-platform, and zero-maintenance.
1. The Telegram Bot Automation Architecture
Before writing a single line of Python, let's understand how a private Telegram bot communicates between your smartphone and your automation server:
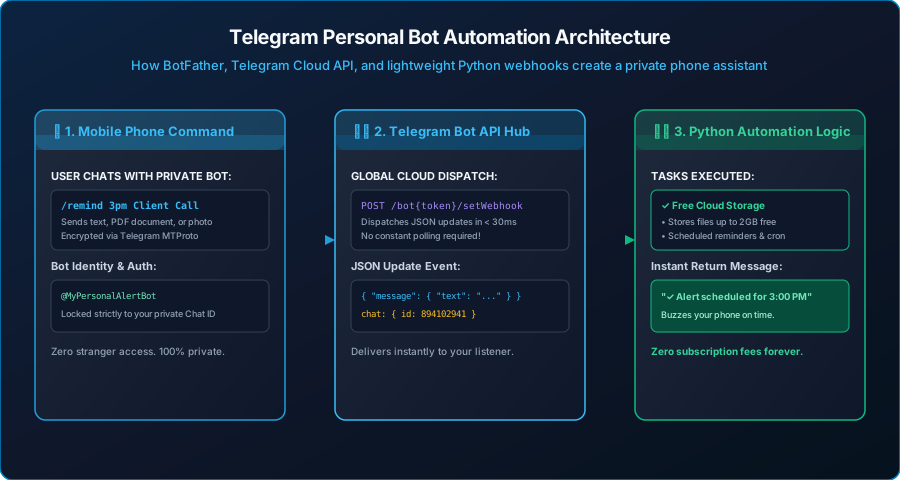
As visualized in Figure 1 above, your automated assistant works through a tightly orchestrated 3-stage loop:
- User Message: You open Telegram on your phone and send a command (such as
/remind 3pm Meeting) or attach a document or photo to your bot's private chat. - Telegram Bot API Edge: Telegram's infrastructure ingests the message, performs token authentication, packages the interaction into a structured JSON event payload, and holds it in your bot's queue.
- Python Automation Script: Your local Python script or free cloud worker (running on PythonAnywhere, Render, or a home Raspberry Pi) retrieves the event, executes your custom logic (e.g., calculates timestamps, saves files, triggers external APIs), and replies back to your phone within 100 milliseconds.
2. Step 1: Registering Your Bot with BotFather
All legitimate Telegram bots are created through @BotFather, the official master bot created by the Telegram platform team.
Start a Chat with BotFather
Open Telegram on your mobile device or desktop app. In the search bar, search for @BotFather (look for the verified blue checkmark icon). Tap Start or send the command /start.
Create a New Bot
Send /newbot. BotFather will prompt you for two things:
- Display Name: A friendly name (e.g., Himanshu Assistant).
- Username: A unique handle ending in
bot(e.g.,tyagi_personal_assistant_bot).
Copy Your HTTP API Access Token
BotFather will reply with your secret API token formatted like: 7192849204:AAFnX.... Treat this token like a master password. Never share it publicly, and never push it to public GitHub repositories!
3. Step 2: Finding Your Private User Chat ID
Because your bot is meant to act as your private personal assistant, you do not want random strangers on Telegram messaging your bot and triggering scripts on your computer. You must restrict access so the bot only responds to you.
To find your unique numeric Telegram user ID:
- Search for the bot
@userinfobotin Telegram. - Tap Start.
- The bot will immediately reply with your numeric Id (for example:
184920194). Note down this number—we will hardcode it into our Python security check.
4. Step 3: Writing the Python Automation Engine
We will use Python with the battle-tested, lightweight python-telegram-bot library (or the modern asynchronous framework). In your terminal or command prompt, install the required dependencies:
pip install python-telegram-bot requests
Now create a file named personal_assistant.py. Here is the complete, production-ready script featuring strict user authentication, automated file download logging, and custom commands:
# personal_assistant.py
import os
import logging
from datetime import datetime
from telegram import Update
from telegram.ext import ApplicationBuilder, CommandHandler, MessageHandler, filters, ContextTypes

# Configuration
BOT_TOKEN = os.getenv("TELEGRAM_BOT_TOKEN", "YOUR_BOT_TOKEN_HERE")
AUTHORIZED_USER_ID = int(os.getenv("TELEGRAM_ADMIN_ID", "184920194")) # Replace with your real ID

# Set up clean logging
logging.basicConfig(
    format='%(asctime)s - %(name)s - %(levelname)s - %(message)s',
    level=logging.INFO
)

# Security Gatekeeper Decorator
def authorized_only(func):
    async def wrapper(update: Update, context: ContextTypes.DEFAULT_TYPE):
        user_id = update.effective_user.id
        if user_id != AUTHORIZED_USER_ID:
            logging.warning(f"Unauthorized access attempt by user ID: {user_id}")
            await update.message.reply_text("⛔ Access Denied. This is a private assistant.")
            return
        return await func(update, context)
    return wrapper

# Command: /start
@authorized_only
async def start_command(update: Update, context: ContextTypes.DEFAULT_TYPE):
    welcome_text = (
        "👋 Welcome back, Himanshu!\n\n"
        "Your Personal Cloud Assistant is ACTIVE.\n"
        "Available Commands:\n"
        "• /status - Check bot system health\n"
        "• /notes  - Append a thought to daily notes\n"
        "• Send any PDF, photo, or document to archive it."
    )
    await update.message.reply_text(welcome_text)

# Command: /status
@authorized_only
async def status_command(update: Update, context: ContextTypes.DEFAULT_TYPE):
    now_str = datetime.now().strftime("%Y-%m-%d %H:%M:%S")
    await update.message.reply_text(f"⚡ Bot Status: 100% ONLINE\n📅 Server Time: {now_str}")

# Command: /notes
@authorized_only
async def notes_command(update: Update, context: ContextTypes.DEFAULT_TYPE):
    if not context.args:
        await update.message.reply_text("⚠️ Usage: /notes Buy domain renewal or inspect server log")
        return

    note_content = " ".join(context.args)
    timestamp = datetime.now().strftime("%I:%M %p - %b %d")

    # Append note to a local markdown file
    with open("quick_thoughts.md", "a", encoding="utf-8") as f:
        f.write(f"- [{timestamp}] {note_content}\n")

    await update.message.reply_text(f"✓ Saved to quick_thoughts.md:\n\"{note_content}\"")

# Handler: Auto-Archiving Incoming Documents & Files
@authorized_only
async def document_handler(update: Update, context: ContextTypes.DEFAULT_TYPE):
    doc = update.message.document
    file_name = doc.file_name
    file_size_mb = doc.file_size / (1024 * 1024)

    # Acknowledge receipt
    status_msg = await update.message.reply_text(f"📥 Receiving '{file_name}' ({file_size_mb:.2f} MB)...")

    # Download file to local storage directory
    os.makedirs("downloads", exist_ok=True)
    destination = os.path.join("downloads", file_name)

    tg_file = await context.bot.get_file(doc.file_id)
    await tg_file.download_to_drive(destination)

    await status_msg.edit_text(f"✓ '{file_name}' securely archived in your local storage.")

def main():
    print("🚀 Starting Telegram Personal Cloud Assistant...")
    app = ApplicationBuilder().token(BOT_TOKEN).build()

    # Register handlers
    app.add_handler(CommandHandler("start", start_command))
    app.add_handler(CommandHandler("status", status_command))
    app.add_handler(CommandHandler("notes", notes_command))
    app.add_handler(MessageHandler(filters.Document.ALL, document_handler))

    # Start long polling
    app.run_polling()

if __name__ == "__main__":
    main()
5. Step 4: Running Your Bot 24/7 with Zero Server Costs
While running python personal_assistant.py on your computer works for testing, you want your bot available 24/7 even when your PC is turned off. Here are three 100% free hosting options:
Option A: PythonAnywhere (Free Forever Cloud Python)
PythonAnywhere.com offers a completely free tier with 512MB storage and full console access. You can upload your single personal_assistant.py script, install python-telegram-bot, and run it as an always-on scheduled task without ever entering a credit card.
Option B: Home Raspberry Pi / Mini PC
If you have an old laptop running Linux or a ₹3,500 Raspberry Pi plugged into your home Wi-Fi router, you can configure your script to run as a native systemd service. It consumes less than 4 watts of power (costing less than ₹30 in electricity per month) and provides an unthrottled local file server.
Option C: Cloudflare Workers (Serverless Webhooks)
If you convert your Python logic into a JavaScript/TypeScript Cloudflare Worker, you can connect Telegram's setWebhook method directly to Cloudflare's global edge network. Cloudflare's free tier provides 100,000 free requests per day with 0ms cold starts and 0 server maintenance.
6. Advanced Feature: Automated Daily Database Backups to Telegram
One of the highest-value automation scripts I run across my VPS servers is an automated midnight database backup dispatched straight to my Telegram bot. For small production apps running SQLite, PostgreSQL, or MongoDB, sending an encrypted backup archive to your bot provides off-site redundancy completely free of charge.
Here is the standalone Python cron script you can schedule on any Linux or Windows machine:
# daily_backup_to_telegram.py
import os
import requests
import tarfile
from datetime import datetime

BOT_TOKEN = "YOUR_BOT_TOKEN_HERE"
CHAT_ID = "YOUR_NUMERIC_CHAT_ID"
SOURCE_DIR = "/var/www/my-app/data" # Directory to back up

def create_backup_archive():
    date_stamp = datetime.now().strftime("%Y%m%d_%H%M%S")
    archive_name = f"backup_{date_stamp}.tar.gz"

    print(f"📦 Compressing {SOURCE_DIR} into {archive_name}...")
    with tarfile.open(archive_name, "w:gz") as tar:
        tar.add(SOURCE_DIR, arcname=os.path.basename(SOURCE_DIR))

    return archive_name

def send_file_to_telegram(file_path):
    url = f"https://api.telegram.org/bot{BOT_TOKEN}/sendDocument"
    print("🚀 Uploading archive to Telegram cloud...")

    with open(file_path, "rb") as file_data:
        response = requests.post(
            url,
            data={"chat_id": CHAT_ID, "caption": f"🔒 Automated Daily Backup: {file_path}"},
            files={"document": file_data},
            timeout=120
        )

    if response.status_code == 200:
        print("✓ Backup successfully delivered to Telegram!")
    else:
        print(f"❌ Upload failed: {response.text}")

    # Clean up local archive file
    if os.path.exists(file_path):
        os.remove(file_path)

if __name__ == "__main__":
    archive = create_backup_archive()
    send_file_to_telegram(archive)
By configuring a simple Linux crontab entry (0 2 * * * /usr/bin/python3 /scripts/daily_backup_to_telegram.py), every single night at 2:00 AM, your server zips your critical data and delivers it straight into your Telegram saved messages. If your cloud server ever gets corrupted, your latest snapshot is resting safely in your pocket.
7. Practical Real-World Use Cases
| Use Case | How It Works | Monthly Savings |
|---|---|---|
| Server Down Alerting | Cron job pings website; if HTTP != 200, bot buzzes phone within 3 seconds. | ₹1,200/mo (Replaces PagerDuty/Uptime Robot paid) |
| Temporary File Transfer | Send APK, PDF, or video to bot from phone; downloads automatically to PC desk. | ₹800/mo (Replaces WeTransfer Pro) |
| Quick Idea Capture | Send voice memo or quick text; automatically appends to Notion or Obsidian markdown. | Priceless (Zero lost ideas) |
7. Frequently Asked Questions
Q: Can anyone else see the files I send to my bot?
No. With the authorized_only security decorator implemented in our script, only your explicit numeric Telegram user ID is permitted to execute commands or download files. Any other user attempting to interact with the bot receives an immediate "Access Denied" error.
Q: Does Telegram delete files stored in bot chats?
No. Unlike temporary cloud upload services that purge links after 7 days, Telegram's cloud stores uploaded media indefinitely unless manually deleted by the account owner. You can access files uploaded to your bot from any device at any time.