
When communicating with clients, partners, banks, or prospective employers, sending messages from a generic address like yourbusiness@gmail.com looks amateurish. A branded business email such as contact@yourdomain.com or himanshu@tyagihub.in instantly establishes professional credibility, brand authority, and digital trust.
While industry giants like Google Workspace charge approximately ₹450 to ₹650 per user each month, and Microsoft 365 requires monthly recurring subscriptions, Zoho Mail offers a hidden "Forever Free" tier. Zoho's free plan allows up to 5 team members to have dedicated custom domain inboxes with 5GB of secure storage per user — completely free of cost with zero trial expiration.
In this exhaustive, verified tutorial, we will guide you through the entire setup process: from locating the free signup page and verifying domain ownership to configuring critical MX, SPF, and DKIM records so your emails land directly in inboxes rather than the spam folder.
For a small startup, developer, or freelancer with 3 team members, Google Workspace costs over ₹18,000 to ₹24,000 annually. By configuring Zoho Mail's Forever Free Plan on your domain, you save 100% of those recurring costs while maintaining a world-class, ad-free business webmail interface.
1. What You Need Before You Begin
Before initiating the setup, ensure you have the following prerequisites ready:
- A Registered Domain Name: Purchased through any registrar (e.g., GoDaddy, Namecheap, Hostinger, BigRock, or Cloudflare).
- Access to Your Domain's DNS Manager: You must have administrative access to edit DNS records (such as your Cloudflare dashboard, cPanel Zone Editor, or GoDaddy DNS Manager).
- A Personal Phone Number: Required by Zoho for initial account verification and Two-Factor Authentication (2FA).
2. Step 1: Navigating to the Zoho Mail "Forever Free" Tier
Zoho frequently updates its homepage to highlight paid enterprise plans. To find the genuine free plan without accidentally entering a 15-day paid trial, follow these exact steps:
Click on Sign Up Now under the Forever Free Plan. This grants 5 users, 5GB/user, and web/mobile app access with zero credit card required.
tyagihub.in), and provide your organization name.
3. Step 2: Verifying Domain Ownership via TXT Record
Before Zoho routes any emails, you must prove that you legitimately control the domain. The fastest and most reliable method is adding a TXT verification record in your domain's DNS panel.
- In the Zoho Setup Wizard, select TXT Method for verification.
- Zoho will generate a unique verification string that looks similar to:
zoho-verification=zb12345678.zmverify.zoho.in. - Open your DNS Manager (Cloudflare, GoDaddy, or Hostinger) in a separate browser tab.
- Add a new DNS record with the following parameters:
- Type:
TXT - Name / Host:
@(or leave blank if your provider does not support '@') - Value / Content: Paste your unique
zoho-verification=...string. - TTL: Automatic (or 300 seconds / 5 minutes).
- Type:
- Return to Zoho and click Verify TXT Record. Once verified, Zoho will instantly grant ownership of the domain.
4. Step 3: Configuring MX (Mail Exchanger) Records
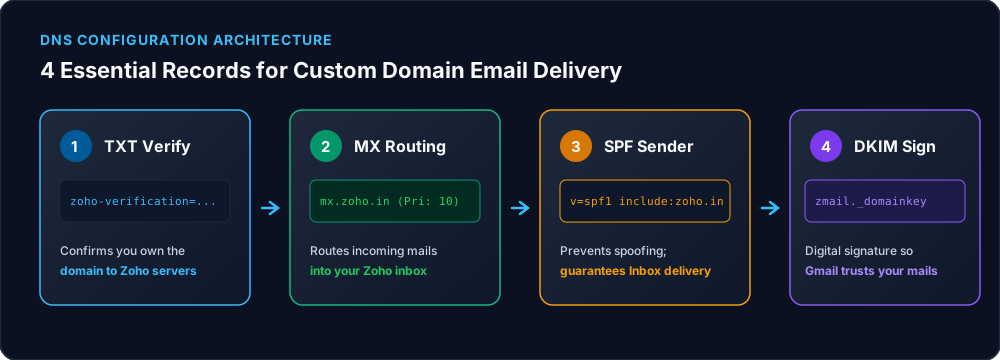
MX records tell the global internet where to deliver incoming emails sent to your domain. If someone sends an email to contact@yourdomain.com, your DNS MX records direct that message directly into Zoho's mail servers.
Before adding Zoho MX records, check your DNS table and delete any pre-existing default MX records (such as default cPanel, GoDaddy webmail, or hosting provider MX records). Having multiple conflicting MX destinations will cause incoming emails to bounce or fail randomly.
Add these three standard MX records in your DNS dashboard:
| Record Type | Host / Name | Mail Server Destination | Priority | TTL |
|---|---|---|---|---|
MX |
@ |
mx.zoho.in (or mx.zoho.com for US accounts) |
10 | Auto / 1 Hour |
MX |
@ |
mx2.zoho.in (or mx2.zoho.com) |
20 | Auto / 1 Hour |
MX |
@ |
mx3.zoho.in (or mx3.zoho.com) |
50 | Auto / 1 Hour |
Note: If you signed up via zoho.in (India Data Center), use .in servers. If you registered via zoho.com (US Data Center), use .com. Your Zoho setup screen will explicitly display which domain suffix to use.
5. Step 4: Setting Up SPF (Sender Policy Framework)
Now that your domain can receive mail, you must ensure that emails you send out are not rejected or flagged as spam by recipients using Gmail, Outlook, or Yahoo.
An SPF record is a public declaration in your DNS that authorizes Zoho's IP addresses to send mail on behalf of your domain name. Without an SPF record, major email providers will assume your email is spoofed phishing and send it straight to the Spam/Junk folder.
- Type:
TXT - Host / Name:
@ - Content / Value:
v=spf1 include:zoho.in ~all - TTL: Automatic / 300 seconds
Important: You must only have one single SPF TXT record per domain. If you already have an SPF record for another transactional tool, combine them (e.g., v=spf1 include:zoho.in include:sendgrid.net ~all).
6. Step 5: Generating and Adding DKIM (Cryptographic Signing)
In 2024–2026, Google and Yahoo instituted mandatory DKIM authentication for all domain senders. DKIM attaches an invisible cryptographic digital signature to every email header you send. When recipient servers receive your message, they check your public DKIM key in your DNS to verify the email was not tampered with during transit.
- In Zoho Mail Control Panel, go to: Email Configuration → DKIM.
- Click Add Selector. You can name the selector anything simple, such as
zmail. - Zoho will generate a long public key string.
- Go to your DNS Manager and add a new TXT record:
- Type:
TXT - Host / Name:
zmail._domainkey - Content / Value: Paste the entire public key string provided by Zoho (starts with
k=rsa; p=...).
- Type:
- Save the record in your DNS. Return to Zoho and toggle the selector status to Active.
7. Step 6: Setting Up DMARC (The Anti-Spoofing Policy)
DMARC (Domain-based Message Authentication, Reporting, and Conformance) ties SPF and DKIM together. It instructs recipient mail servers on what to do if an email claiming to be from your domain fails authentication checks:
- Type:
TXT - Host / Name:
_dmarc - Value:
v=DMARC1; p=none; rua=mailto:admin@yourdomain.com
Setting p=none allows you to monitor email deliverability reports without accidentally blocking genuine messages while your new domain warms up.
8. Complete DNS Records Summary Table
For quick reference, here are all four essential records consolidated into one checklist:
| Purpose | Record Type | Host / Name | Value / Target |
|---|---|---|---|
| Domain Ownership | TXT |
@ |
zoho-verification=zb... |
| Primary MX | MX (Priority 10) |
@ |
mx.zoho.in |
| Backup MX 1 | MX (Priority 20) |
@ |
mx2.zoho.in |
| Backup MX 2 | MX (Priority 50) |
@ |
mx3.zoho.in |
| SPF Anti-Spam | TXT |
@ |
v=spf1 include:zoho.in ~all |
| DKIM Signature | TXT |
zmail._domainkey |
k=rsa; p=... (from Zoho Panel) |
| DMARC Alignment | TXT |
_dmarc |
v=DMARC1; p=none; |
9. Step 7: Creating User Inboxes and Aliases
Once DNS propagation finishes (typically within 5 to 30 minutes), you can configure your team's mailboxes:
- Primary Inboxes: In the Zoho Mail Admin Console, go to User Management → Users. Click Add User to create inboxes like
himanshu@tyagihub.inorsales@tyagihub.in(up to 5 free accounts). - Email Aliases (Pro Tip): You do not need to burn a separate user account for general inquiries. In your primary user settings, navigate to Mail Accounts → Email Aliases and add aliases like
info@yourdomain.com,support@yourdomain.com, orcontact@yourdomain.com. All messages sent to these aliases will route directly into your main inbox!
10. Accessing Your New Business Email on Mobile
Zoho Mail's Forever Free Plan provides full access through modern mobile apps on both Android and iOS:
- Download the official Zoho Mail application from the Google Play Store or Apple App Store.
- Sign in with your newly created custom domain email address and password.
- You will receive push notifications, real-time message synchronization, and access to Zoho Calendar and Contacts with an ad-free interface.
Zoho's Forever Free Plan includes web browser access (via mail.zoho.in) and the official Zoho Mail mobile applications. Third-party desktop email clients (like Microsoft Outlook desktop or Apple Mail desktop via IMAP/POP3) require a paid Mail Lite upgrade. For 95% of small business users and freelancers, the official Zoho web and mobile apps provide a far superior, cloud-synchronized experience.
11. Frequently Asked Questions
- Domain ownership verified via TXT string.
- Pre-existing old MX records deleted; 3 Zoho MX records added.
- Single SPF TXT record active on root domain.
- DKIM selector
zmail._domainkeyset to Active. - DMARC policy record added.
- Test email successfully sent and received.