
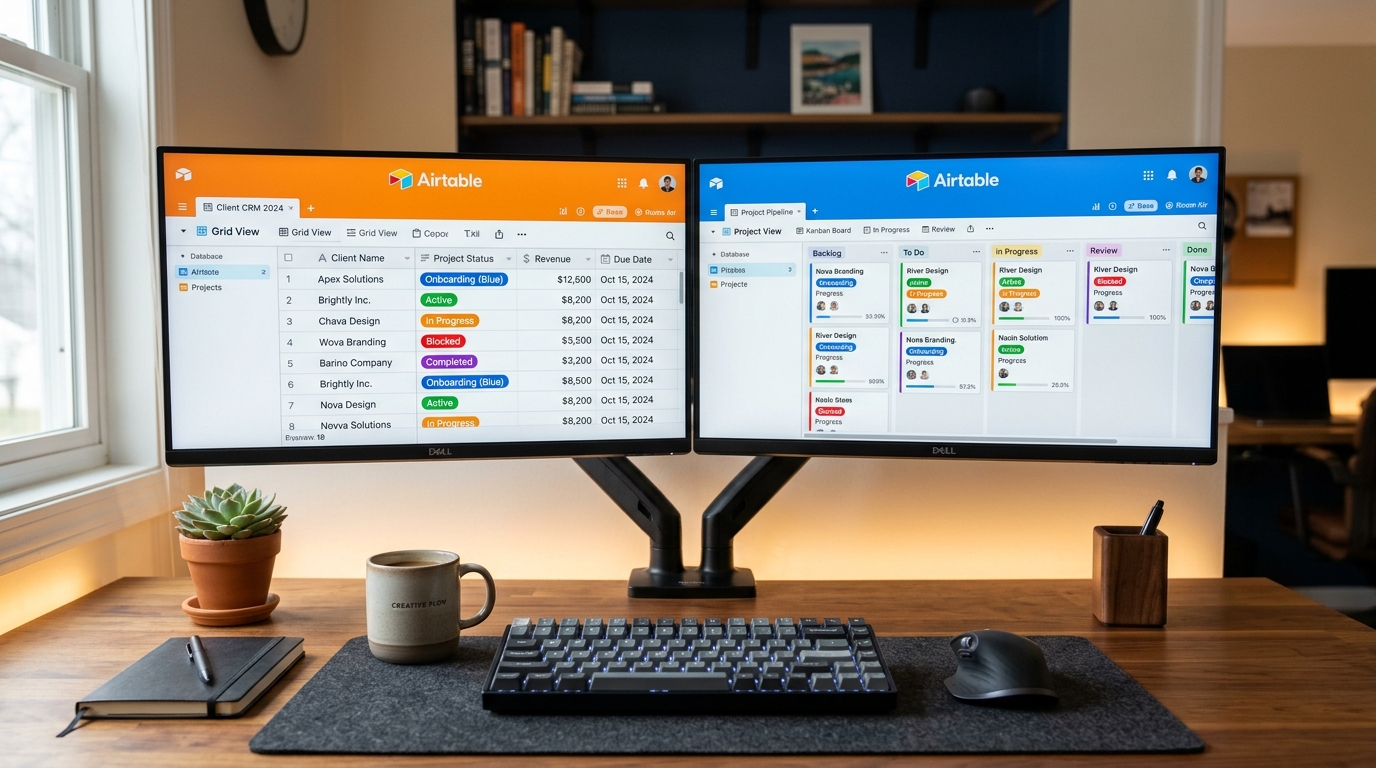
If you are doing freelance work, building web projects, or managing orders for a small business, I am willing to bet you started your workflow exactly where I did: a giant, colorful Google Sheet or Excel workbook.
For the first three or four clients, a basic spreadsheet works fine. But once you cross 15 or 20 active leads, projects, and invoices, spreadsheets start breaking down fast:
- You type the exact same client phone number and email in twelve different rows.
- Someone changes a status in column D, and your formulas throw a mysterious
#REF!error. - You have no clean way to see which projects are currently stuck without scrolling through dozens of horizontal cells.
- Attaching contract PDFs or design files turns your sheet into an unreadable mess.
For a long time, I resisted switching to dedicated database software because I assumed tools like Airtable were complex, expensive enterprise platforms built only for venture-backed startups. I was wrong.
Airtable is essentially what happens if a spreadsheet and a database had a child, and made it as easy to use as Lego blocks. In this tutorial, I will walk you through the exact 3-table client tracker system I built on Airtable's 100% free plan. It took me about twelve minutes to set up from a blank base, and it has saved me dozens of hours of administrative headache.
Airtable's free tier includes unlimited bases (projects), up to 1,000 records per base, and 1GB of attachment storage. Unless you are managing thousands of leads per month, you will not pay a single rupee for this setup.
1. The Mental Shift: Spreadsheet Cells vs. Database Records
Before opening Airtable, you need to understand one core concept that makes spreadsheets painful for client management:
In Excel or Google Sheets, a cell is just an isolated box. You can type a date in one box, a paragraph in the box below it, and an image URL next to it. Spreadsheets do not understand relationships.
In Airtable, every row is an object (record), and every column has a strict data type (like Phone Number, Single Select, Attachment, or Linked Record). Most importantly, Airtable allows you to link tables together.
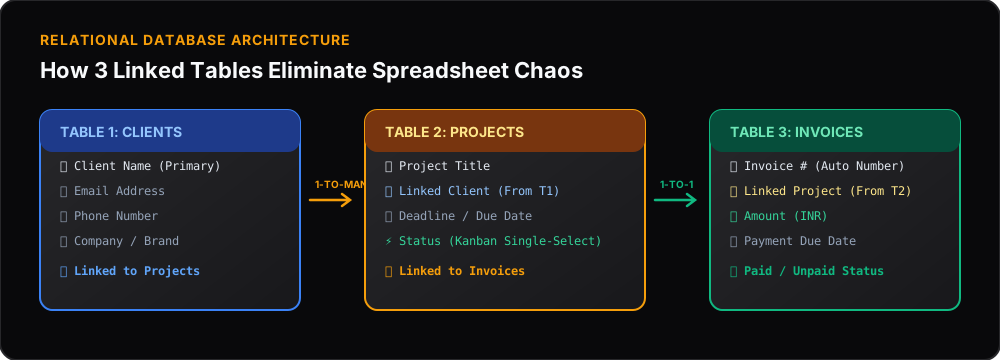
Instead of copying a client's company name and phone number on every single project row, you store the client's information once in a "Clients" table, and simply link projects to that client. If the client changes their phone number later, you update it in one place, and it automatically reflects across every project and invoice linked to them.
---2. Our 3-Table Architecture
---
3. Step-by-Step Build: Setting Up the Base in 12 Minutes
Create a free account at airtable.com, click "Create a Base", and choose "Start from scratch". Name your base "Client & Project Tracker".
Step 1: Build Table 1 — "Clients"
Rename the first table tab to Clients. Configure these columns (fields):
- Client Name (Primary Field): Set field type to Single line text. This will be the main label (e.g., Ramesh Sharma or Acme Tech).
- Email: Click the
+button to add a field → select Email type. - Phone: Add a field → select Phone number type.
- Company Name: Single line text.
- Client Status: Add a field → select Single select. Add three color-coded options:
- 🟢 Active
- 🟡 Lead / Prospect
- ⚪ Past Client
Add two sample clients right now so you can test linkages later. For example: Row 1: "Sharmaji Bakery" (Active), Row 2: "Apex Logistics" (Lead).
Step 2: Build Table 2 — "Projects"
Click the + Add or import button next to the table tabs and create a second blank table named Projects. Configure these fields:
- Project Name (Primary Field): Single line text (e.g., "Website Redesign", "Monthly SEO").
- Client (The Magic Link): Add a field → choose Link to another record → select Clients.
When you click this cell, Airtable pops up a searchable list of your clients from Table 1. Click a client, and the record links instantly!
- Due Date: Add a field → select Date.
- Status: Add a field → select Single select with four stages:
- 🔵 Backlog / To-Do
- 🟡 In Progress
- 🟠 In Review / Feedback
- 🟢 Completed & Delivered
- Project Fee: Add a field → select Currency (INR ₹).
- Attachments: Add a field → select Attachment (perfect for dropping wireframes, briefs, or contracts directly onto the record).
Step 3: Build Table 3 — "Invoices & Payments"
Create a third table named Invoices to keep track of who owes you money:
- Invoice Number (Primary Field): Select Autonumber or Single line text (e.g., INV-001).
- Linked Project: Choose Link to another record → select Projects.
- Amount: Currency (INR ₹).
- Payment Status: Single select:
- 🔴 Unpaid / Pending
- 🟢 Paid in Full
- 🟡 Partially Paid
- Due Date: Date.
4. The Power Move: Switching to Kanban & Calendar Views
The biggest reason I will never go back to spreadsheets is Airtable's Views.
In a spreadsheet, you are stuck with a grid of rows and columns. In Airtable, the underlying data remains the same, but you can display it in completely different visual layouts with one click:
A. The Drag-and-Drop Kanban Board
- Go to your Projects table.
- In the top-left corner, click Views → select Kanban.
- When prompted for "Group by", select Status.
- Instantly, your spreadsheet turns into a visual Trello-style board! You can see your projects grouped into columns (To-Do, In Progress, In Review, Completed). When you finish a task, just drag the card from one column to the next.
B. The Deadline Calendar View
Click Views → Calendar → select the Due Date field. All your project deadlines populate onto a clean monthly calendar, giving you an immediate visual sense of upcoming deliverables.
---5. Three Mistakes I Made as an Airtable Beginner (Avoid These!)
When I first moved over from Excel, I made a few rookie errors that caused confusion. Here is what you should avoid:
In Excel, people often cram five different pieces of info into one cell (e.g., "John Doe - 9876543210 - Paid ₹5000"). In Airtable, always create dedicated fields with the right type. Having a real Phone field lets you tap to call directly from the mobile app; having a real Currency field lets you run instant mathematical sums.
If a client hires you for a second project six months later, do NOT create a new row in your Clients table. Just open your Projects table, create the new project, and link it to the existing client record.
Airtable has powerful automation features (like sending automated emails when a status changes). Do not worry about automations when starting out. Spend your first two weeks getting comfortable updating your Kanban board manually before adding automated triggers.
6. Frequently Asked Questions
- Base created from scratch named "Client & Project Tracker".
- Table 1 (Clients) built with Email, Phone, and Status fields.
- Table 2 (Projects) built with Linked Record to Clients and Date field.
- Table 3 (Invoices) built with Linked Record to Projects and Currency field.
- Kanban View generated on Projects table grouped by Status.
- Airtable mobile app downloaded for on-the-go updates.