
If you charge clients on an hourly basis or quote milestone budgets based on estimated labor, you are almost certainly losing between 15% and 25% of your billable revenue every month. Unrecorded bug fixes, "quick five-minute" client phone calls, and chaotic context-switching quietly siphon hours away from your earnings without ever appearing on an invoice.
Even worse than lost revenue is the awkward end-of-month confrontation with a skeptical client: "Why did the landing page redesign take 34 hours instead of 20?" When you send a simple invoice with a single flat line item, clients feel anxious and question your pricing. But when that same invoice is accompanied by an itemized, timestamped, minute-by-minute audit timesheet, disputes vanish instantly.
While enterprise platforms like Harvest and Toggl Track charge upwards of $10 to $18 per user every month, Clockify offers an extraordinarily generous Forever Free tier with unlimited projects, unlimited clients, and full PDF reporting. In this comprehensive, verified tutorial, I will walk you through setting up a professional freelance time tracking command center that automates your billing pipeline and protects your hard-earned income.
Clients do not argue over hourly rates—they argue over opacity. When a client sees transparent logs displaying exact timestamps (e.g., "Nov 3, 10:15 AM - 11:45 AM: Refactored MongoDB connection pool & resolved connection leak"), they immediately recognize your technical rigor and approve invoices without friction.
1. The Freelancer Time Tracking Pipeline
To prevent time tracking from feeling like tedious administrative overhead, your tracking workflow must be fast, frictionless, and tightly coupled with your invoicing structure.
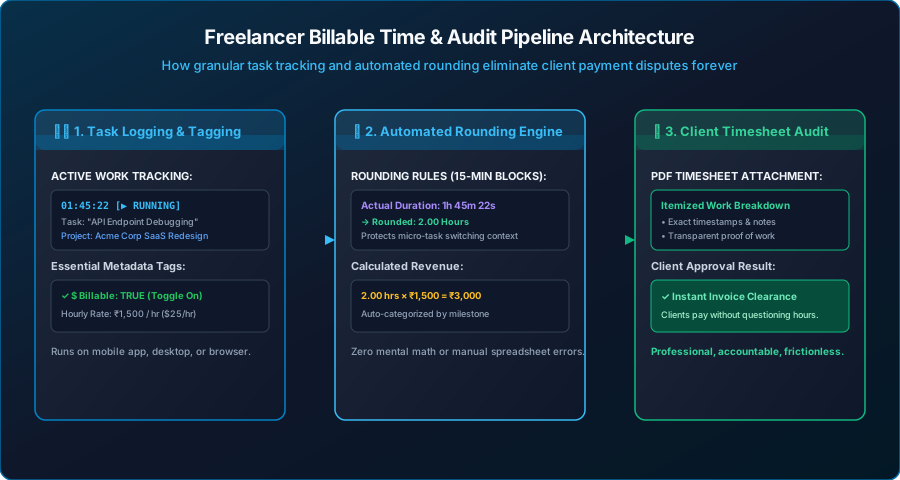
As visualized in Figure 1, an effective tracking system relies on three distinct stages:
- Active Logging & Metadata Tagging: Rather than guessing hours at the end of the day from memory, you start a live timer when opening your editor or terminal. You assign the task to an explicit Client and Project, and toggle the Billable ($) flag.
- Automated Rounding Engine: In modern freelance consulting, micro-tasks (answering emergency emails, reviewing pull requests) eat up cognitive focus. By enforcing standard 15-minute rounding increments, you ensure context-switching costs are accurately reflected in billable calculations.
- 1-Click Client Audit PDF: At the close of a billing cycle, Clockify compiles all logged entries into a branded, professional summary report that attaches cleanly to your GST invoice or international wire request.
2. Step 1: Setting Up Clients, Projects & Billable Rate Cards
The biggest mistake new Clockify users make is hitting the "Start" button before configuring their workspace taxonomy. Without structured clients and projects, your reports turn into a messy soup of unassigned hours.
Create Client Entities
In the Clockify sidebar, click on Clients → Add new client. Enter the company or individual client name (e.g., Apex Digital Solutions, Studio North, or Local Retail Pvt Ltd). Grouping by client allows you to run multi-project cross-summaries.
Add Projects & Assign Color Codes
Navigate to Projects → Create new project. Link the project to its corresponding client, assign a distinctive color (e.g., Blue for Frontend, Emerald for API Development, Amber for DevOps), and set privacy to Public (within your private workspace).
Configure Your Default Hourly Billable Rate
Go to Settings → General → Default Billable Rate. Enter your baseline rate (for example, ₹1,500/hr or $35/hr). You can also override this rate on a per-project basis if high-intensity architecture consulting commands a higher rate than routine maintenance.
3. Step 2: Mastering the Daily Tracking Workflow (Timer vs Manual)
Clockify provides two primary logging methods: the Live Stopwatch Timer and the Manual Grid Timesheet. Depending on your working style, you should choose the method that causes the least cognitive friction.
Method A: The Real-Time Stopwatch (Best for Deep Focus)
Keep Clockify open in a dedicated browser tab, install the lightweight desktop app (available for Windows, macOS, and Linux), or use the browser extension. When starting a coding sprint:
- In the "What are you working on?" input field, write a descriptive sentence, not a vague single word. Write
Implementing Stripe Webhook Signature Verificationrather than justCode. - Click the Project selector and choose your client's project.
- Ensure the blue $ (billable) icon is toggled on.
- Hit Enter or click Start.
In Clockify Desktop Settings, enable Idle Detection (set to 10 minutes). If you step away from your desk to make coffee or receive an Amazon delivery, Clockify detects the lack of mouse/keyboard input and asks upon your return: "You were away for 18 minutes. Keep the time, or discard it?" This prevents accidentally billing clients for your lunch break.
Method B: Manual Mode (Best for Retrospective Logging)
If you find starting and stopping timers stressful, switch to Manual Mode (toggle the timer icon to a list icon in the top right). At the end of your workday, review your Git commit history and calendar events, and quickly type your completed blocks:
09:30 AM - 11:30 AM→ Database migration & schema adjustments (2.0 hrs)01:00 PM - 03:15 PM→ Frontend checkout UI responsive styling (2.25 hrs)04:00 PM - 04:45 PM→ Client staging walkthrough call (0.75 hrs)
4. Step 3: Implementing the 15-Minute Rounding Rule
One of the most critical principles in sustainable freelancing is the minimum billing increment. When a client messages you on WhatsApp asking to modify a button label, and it takes you 4 minutes to change the CSS, commit, and deploy, you should never bill 0.06 hours (₹100).
That 4-minute modification interrupted your deep focus, required you to pull the latest repository branch, and involved testing in staging. To account for cognitive switching overhead, professional service agreements stipulate that all time is rounded up to the nearest 15-minute increment (0.25 hrs).
| Actual Logged Duration | Rounded Billable Hours | Financial Impact (@ ₹1,500/hr) |
|---|---|---|
| 6 minutes (Urgent hotfix) | 0.25 Hours (15 min) | ₹375 (vs unrounded ₹150) |
| 38 minutes (Feature testing) | 0.75 Hours (45 min) | ₹1,125 (vs unrounded ₹950) |
| 1 hour 5 minutes | 1.25 Hours (75 min) | ₹1,875 (vs unrounded ₹1,625) |
Over an average month consisting of 40 to 60 micro-tasks, enforcing standard 15-minute rounding legitimately adds between ₹8,000 and ₹18,000 to your bottom line—without inflating a single minute of dishonest work.
5. Step 4: Generating & Exporting Client Timesheet Audits
When invoice day arrives, navigate to Reports in your Clockify sidebar. Clockify provides three reporting views:
- Summary Report: Displays high-level project totals, billable vs non-billable distribution, and total earned revenue. Ideal for sharing with business executives or startup founders who only want the macro budget status.
- Detailed Report (Recommended for Invoicing): Shows every single itemized task, exact start and end timestamps, assigned tags, and individual cost calculations. This is the gold standard for attachment to your invoices.
- Weekly Timesheet: A grid view breaking down hours by day across Monday through Sunday.
To export a spotless, audit-ready PDF timesheet:
- In the Detailed Report, set the Date Range filter to your current billing cycle (e.g., "Last Month" or "Custom: Nov 1 - Nov 15").
- Filter by the specific Client so entries from different clients never bleed into each other.
- Verify that the Billable filter is checked to hide internal personal tasks.
- Click the Export button in the top right and select Save as PDF.
Clockify generates a clean, beautifully formatted PDF featuring your business name, client name, total calculated hours, total billing sum, and complete task notes. Send this PDF directly alongside your GST invoice. When clients see this level of transparent accountability, they pay promptly and view you as an elite partner rather than a risky expense.
6. Feature Comparison: Clockify vs Toggl Track vs Harvest
How does Clockify compare to the other major time tracking tools used by independent consultants and software developers?
| Platform | Free Tier Generosity | Client & Project Limits | PDF Reporting | Paid Upgrade Cost |
|---|---|---|---|---|
| Clockify | 100% Free Forever | Unlimited | Full (Detailed + Summary) | $3.99 / user / month |
| Toggl Track | Limited (Up to 5 users) | Unlimited | Basic PDF export | $9.00 / user / month |
| Harvest | Extremely Restricted | Only 2 active projects! | Full PDF + Invoicing | $10.80 / user / month |
7. Frequently Asked Questions
Q: Is Clockify really 100% free forever for solopreneurs?
Yes. Clockify's business model monetizes enterprise companies needing audit logs, single sign-on (SSO), and manager approval workflows. For an independent developer, designer, or freelancer, all core features—unlimited projects, unlimited timers, and PDF exports—remain completely free with zero trial expiration.
Q: Does Clockify take random desktop screenshots of my screen?
No! Clockify is a professional time tracking platform, not intrusive spy software. It does not record keystrokes, track web cam video, or take background screenshots. You retain full control over your recorded data and can edit or delete entries at any time.
Q: Can I track time offline without an active internet connection?
Yes. Clockify's desktop and mobile applications support full offline tracking. If your internet connection drops while traveling or coding, the timer continues running locally. The moment your device reconnects to Wi-Fi, all logged entries sync seamlessly to your cloud dashboard.