

When I first downloaded Notion a few years ago, I fell straight into the trap that ensnares nearly every new user: I spent three full days downloading aesthetic $40 templates, adding animated weather widgets, embedding Spotify playlists, and color-coding sixty different nested subpages.
Within two weeks, I had completely abandoned it. Opening my dashboard felt like walking into an overdecorated digital museum rather than getting work done. I spent more time rearranging little pastel icons and tweaking database tags than actually pitching clients, writing code, or delivering projects.
If you are running an independent business, freelancing, or juggling client deliverables as a solo operator, you do not need an aesthetic labyrinth. You need an operating cockpit. You need a single screen where you open your laptop in the morning, immediately see what needs to be delivered today, capture raw client notes in seconds, and close your laptop without wondering if a critical deadline fell through the cracks.
In this hands-on, zero-fluff walkthrough, I will guide you step by step through the exact 3-database relational architecture I use every day. It runs 100% on Notion's free tier, requires zero paid plugins or templates, and takes less than thirty minutes to build from a completely blank page.
If a workspace requires more than three clicks or five seconds to log a new task or client note, you will stop maintaining it within a month. Our system separates where data lives (background relational tables) from where you work (a single, distraction-free morning command dashboard).
1. The Architecture: Why the "3-Database Core" Works
Most broken Notion setups make the fatal mistake of dumping everything into one giant, chaotic to-do list. The moment you combine high-level client contracts with quick reminders like "Send invoice to Rahul" and "Buy new USB-C cable", your workspace turns into cognitive noise.
Instead, professional workflows rely on a proven three-tier hierarchy:
- Tier 1 — Clients Database (The Master CRM): Holds high-level company names, primary contact persons, retainer values, and contracted billing terms.
- Tier 2 — Projects Database (The Deliverables Hub): Represents distinct milestones or deliverables (e.g., "Redesign Landing Page" or "Q4 Financial Audit"), linked directly to a client.
- Tier 3 — Daily Tasks Database (The Execution Engine): Individual, actionable checkboxes (e.g., "Draft wireframe", "Send draft PDF"), linked to an overarching project.
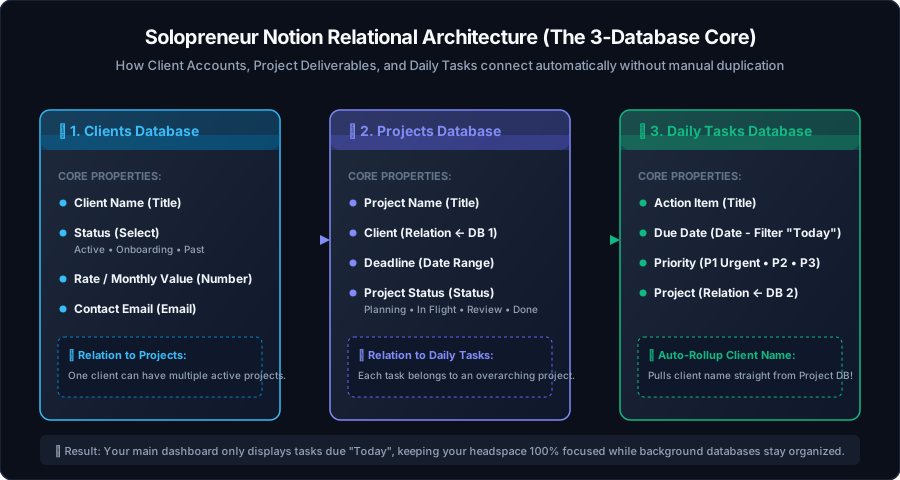
By connecting these three tables with Notion's native Relations and Rollups, you only ever need to type a client's name once. From that moment forward, every project, invoice milestone, and daily task inherits the client's information automatically.
---2. Step 1: Create the Background Storage Page
To keep our final dashboard clean and fast, we first build a dedicated "Backstage" page where our raw database tables will live. This ensures you never accidentally delete an entire database while editing your morning homepage.
[System] Databases Archive.
Give it a wrench or gear icon (⚙️) so you know it's a backend system folder.
3. Step 2: Build Database 1 — The Clients CRM
Inside your [System] Databases Archive page, type /table full page and name the database Clients CRM.
Configure the table with the following essential properties (avoid adding unnecessary fields):
| Property Name | Property Type | Purpose & Suggested Values |
|---|---|---|
| Client Name | Title (Default) | The business or individual name (e.g., Acme Corp, Studio North). |
| Status | Select | Options: Active Retainer, Fixed Project, Lead / Pitch, Completed. |
| Monthly Value | Number | Format as currency (₹ or $). Useful for calculating your total recurring revenue. |
| Primary Email | Direct contact point for invoice submissions and deliverables. | |
| Billing Cycle | Select | Options: 1st of Month, 15th of Month, Net 15 Upon Delivery. |
Add two sample clients right now (e.g., Apex Design Studio with status Active Retainer and Nova Labs with status Fixed Project). Having dummy data makes configuring the next relation steps effortless.
4. Step 3: Build Database 2 — Active Projects Hub
Return to your [System] Databases Archive page, type /table full page again, and name this database Projects Hub.
This database tracks broad milestones that usually take between one week and three months to complete. Set up these properties:
| Property Name | Property Type | Purpose & Configuration |
|---|---|---|
| Project Name | Title | The specific deliverable (e.g., Website Rebranding, Q1 Tax Audit). |
| Client | Relation | Link to Clients CRM. Enable Show on Clients CRM. |
| Status | Status | Groups: Not Started, In Progress, Under Client Review, Delivered. |
| Target Deadline | Date | The final agreed submission date. |
| Priority | Select | Options: 🔥 High, ⚡ Normal, 🌱 Low. |
Notice the magic of the Relation property: when you type "Website Rebranding", you simply click on the Client column and select "Apex Design Studio" from your CRM. Both databases are now permanently synchronized.
---5. Step 4: Build Database 3 — The Daily Tasks Engine
The final database is where you will spend 90% of your daily working hours. In the archive page, create another table named Daily Tasks.
Configure these specific properties:
| Property Name | Property Type | Purpose & Exact Setup |
|---|---|---|
| Task | Title | Actionable, granular verb phrase (e.g., Draft 3 hero section mockups). |
| Due Date | Date | Crucial for our automatic morning filtering. Set to today's date for tests. |
| Status | Status | Options: To-Do, In Progress, Done. |
| Project | Relation | Link to Projects Hub. Enable two-way linking. |
| Client (Auto) | Rollup | Select relation Project → property Client → calculate Show original. This automatically pulls the client name without any manual typing! |
6. Step 5: Assemble the "Solopreneur Command Center" Dashboard
Now comes the satisfying part: bringing everything together on a clean, beautiful morning dashboard.
⚡ Today Hub (or Command Center).
/2 columns.
In the left column, write a motivational headline like "🎯 Focus: Deliver 3 core tasks before checking email." In the right column, add a quick callout box for brain-dump scratchpad notes.
/linked view of database and choose Daily Tasks.
7. The Secret Sauce: Configuring the "Today Only" Kanban View
A giant task list causes paralysis. To turn our linked database into an intuitive daily Kanban board:
- In your linked view, click the view dropdown and select Board view.
- Group the board by Status (columns: To-Do, In Progress, Done).
-
Click Filter → select Due Date → choose:
Due Date is on or before Today - Click Properties and make visible: Project, Client (Auto), and Due Date.
If you only filter for "Due Date is Today", any task you failed to finish yesterday will vanish into digital limbo. By setting the filter to "On or before Today", overdue tasks stay visible in red until you either complete them or reschedule them. Zero forgotten tasks!
8. Adding the Active Projects Pipeline View
Right below your Daily Tasks Kanban, insert a second linked database view:
- Type
/linked view of database→ choose Projects Hub. - Select Gallery view or Table view.
-
Add a filter:
Status is not Delivered. - This gives you a clear bird's-eye view of your 3–5 active client commitments without cluttering your immediate morning task list.
9. Notion Free Tier Optimization & Performance Rules
Many solopreneurs assume they need Notion's paid "Plus" plan ($10/month). In reality, Notion's Free Plan offers unlimited pages and blocks for solo users. You only need to follow these four optimization rules to keep it running smoothly forever:
| Rule | What to Do | Why It Matters |
|---|---|---|
| 1. Avoid Heavy Video/PDF Uploads | Link external assets via Google Drive or Dropbox links rather than uploading raw 100MB files directly into Notion. | Free plan has a 5MB per-file upload limit. External links keep Notion snappy and free. |
| 2. Archive Completed Projects | Every quarter, filter projects marked "Delivered" and move them to an "Archive 2026" subpage. | Keeps database queries lightning-fast on mobile phones. |
| 3. Limit Third-Party Widgets | Avoid slow iframe widgets (clocks, aesthetic quotes, external calendars). | Third-party widgets increase page load times by 3–4 seconds on mobile data. |
| 4. Use Mobile Lock | In the Notion mobile app (iOS/Android), click the top right menu and select Lock Database on your dashboard. | Prevents accidental finger drags and property deletion when checking tasks on your phone. |
10. Frequently Asked Questions (FAQ)
⚡ Today Hub page by clicking the star icon. On iOS or Android, you can even add a native Notion Home Screen Widget that opens directly to your Today Tasks board with a single tap.
Conclusion: Keep It Lean and Get to Work
Productivity is not measured by the complexity of your software setup; it is measured by the quality and consistency of your output.
By setting up this 3-database relational core, you gain all the power of an enterprise project management suite with zero cost, zero bloat, and zero maintenance friction. Take 25 minutes today to configure your archive, connect your relations, set your morning filter, and enjoy the peace of mind that comes with knowing exactly what to conquer tomorrow morning.